Thursday, March 3, 2016

Scrapbook Getaway Weekend at North Bend State Park


Hi Crafty Friends,
I just wanted to take a minute to let everyone know about the Scrapbook Getaway Weekend at North Bend State Park. This is an awesome chance to get together with fellow paper crafters and enjoy a relaxing weekend at one of West Virginia's beautiful state parks. The event will be held at North Bend State Park on April 15-17. If you live in WV, Ohio or the surrounding area then you should check this out. Learn more by visiting the WV State Parks website at wvstateparks.com (the calendar of events is on the right hand side of the homepage) or contact the park directly (304.643.2931 or 1.800.CALL.WVA) to register. I would also be happy to email you a copy of the brochure. Hope you join the fun!

post signature

How To Make A Card Box With The Envelope Punch Board

I love using my Envelope Punch Board for creating custom envelopes for cards but did you know you can also use it to create boxes? Today I will show you how to make a card box using the Envelope Punch Board. With just three additional steps you can make a box for any of the card sizes listed on the Envelope Punch Board. You will be amazed how versatile this tool is and how easy it is to create a card box. Let me know what you think. post signature


Wednesday, March 2, 2016

Mosaic Technique


Good Morning Crafty Friends,
Today I am sharing another card project from Scrap-Fest. I really don't know what this technique is called so I called it the "mosaic technique" because it reminds me of all the beautiful pieces of glass that are used to build a mosaic image.  It looks A LOT more complicated than it really is. I used Press-'n-Seal wrap to help organize my pieces. Press-'n-Seal (Yes! the stuff from your kitchen!!) has a tacky surface that lightly sticks to cardstock pieces and is perfect for this project. I hope you give this technique a try and tell me what you think. I suggested two different die sets in my tutorial but you may have other detailed dies that would work great for this. Make the most of what you have!


Happy Crafting,
post signature


Tuesday, March 1, 2016

Reflection Technique


The card I am sharing today features the reflection technique. I have experimented with this technique and decided at times I like a very vivid reflection but other times I want my reflection to be softer and more muted. I will show you examples of both in the video tutorial and you can decide which you like best.

One thing I really like about this technique is that it doesn't require a lot of specialized products or tools. To transfer my reflected image, I used a piece of stencil material because I couldn't find my trusty pad of acetate (Thank goodness it finally showed up again! I love it!!) but you could try any smooth, nonporous plastic surface. I also used a brayer to apply some gentle pressure over my reflected image but you could just rub firmly with your fingers or even the back of a stamp block. You folks are creative so use the resources around you.

Happy Crafting,

post signature


Monday, February 29, 2016

Rose Garden Cards #1 & #3


I made two different cards using the Rose Garden thinlet set from Stampin Up (which has become my all time favorite die set.) The cards look very, very similar but are made entirely differently. I think both are equally beautiful but Rose Garden Card #1 requires a double sided adhesive sheet. Rose Garden Card #3 does not require any unusual supplies other than a die.

FYI, I used a product called Wacky Tac in the Rose Garden Card #1 video tutorial. I actually bought my Wacky Tac at a garage sale but I don't seem to be able to find it for sale anywhere. There is a similar product called Stick It Adhesive Sheets. These "micro thin" double sided adhesive sheets are very similar and would be a great substitute. There are probably other products that would also work but I haven't had experience with them.


post signature

Thursday, February 25, 2016

News About Scrap-Fest!


Welcome Crafty Friends,

Spring Scrap-Fest is this Friday and Saturday. I know it's not spring YET, but I am going to be a grandma very, very soon (Can you see my giant smile?) so I had to move things up just a bit. I have super busy trying to get prepared. This week I plan to share photos and video tutorials for some of the projects I am demonstrating. Please check back if you'd like to see what you missed.

I am afraid I haven't been a very good blogger but, I will try to check in more often. I have been busy giving my craft room a major face lift and it's looking much, much better. I have struggled with how to organize things so they are easy to use and aesthetically pleasing. Maybe I will even give you a peek into my craft room after I get things put back where they belong. I takes a tremendous number of tools and supplies with me for the Scrap-Fest Demos so it may take me a while to piece my room back together. I worked  hard to make a home for everything so cleanup should be much easier and faster than usual.

Happy Crafting,
post signature

Thursday, October 22, 2015

How to Create Perfectly Matted Layers Using Nested Dies


Hi Crafters,

Today I want to share a few tips on how to use nested dies, such as Spellbinder dies, to create perfectly matted layers for your greeting cards. The technique is not difficult but you must follow a few basic steps to achieve a good result. The mats you create with this technique will make your focal image really stand out and will give your cards a more finished appearance. I will demonstrate this technique using two mats and then using three mats but you could use as many mats as you like. I hope this tutorial is helpful and that you find many ways to use these matted layers in your crafting.

Enjoy,
post signature


Thursday, October 15, 2015

Patchwork Pumpkin Card


Hello Again,

Today I am making another fall card project. I gathered up some of my Fall prints and solid colored cardstock scraps and cut them into 1.5 inch wide pieces. I borrowed a pumpkin shaped Spellbinder die from my crafty friend Sharon and made a patchwork pumpkin card. This is really a great seasonal card that can be used for lots of occasions - thank you notes, thinking of you cards, get well cards....

You could also use this patchwork idea to make a patchwork stocking. In fact you could use any of the large outline die shapes to create this style of card. I'd love for you to email me a picture of your creation so I can share it in a future post.

Happy Crafting,
post signature

Friday, October 2, 2015

Adorable Paper Purse and Faux Shaker Card


Hi Crafty Friends,

Today is the second day of Scrap-Fest so I have a few more video tutorials to share with you. We will be making and "adorable paper purse" that I am just in love with! We will also be making a "faux shaker card." I hope you enjoy todays projects and decide to give them a try. Please leave a comment and let me know what you think.

Enjoy,
post signature

Window Card and Envelope Punch Board Bow and Gift Card

Welcome!

Today is the first day of Scrap-Fest. a two day crop that I help host as a fundraiser for our community sports complex. Scrap-Fest is held in the fall and spring of each year. I create video tutorials to go with some of the projects that I demonstrate at Scrap-Fest and post them on YouTube and on this blog.  Today I will post two of the Fall Scrap-Fest projects.  The first one is for a "window card" and the second is for an Envelope Punch Board project.

Enjoy,
post signature


Monday, September 21, 2015

Inlaid Leaf Border Card

Thanks for stopping by. Today I am doing another fall themed card. It really started out as a way to use up scraps from my previous two cards but turned into a really fun project. I used a border die from Poppy Stamps to cut out a leaf border along a layering piece. Then I popped the layer up on a "generous" number of pop dots. Next, I inlaid some fall colored leaves that were cut using the same die. Wow! what a cute card and the best part is, it only took a few minutes to assemble and used up some of those bits and pieces of paper that were lying about. Hope you give this technique a try.

Happy Stamping,

post signature

Sunday, September 20, 2015

Embossed Background Card


Hi Crafty Friends,

Today I am having fun experimenting with dry embossing to add texture and dimension to a card. I will be using an embossing folder (and my trusty Sizzix Big Shot) as well as a scoring board to make and easy and interesting Autumn card.

Happy Scrapping,
post signature

Wednesday, September 16, 2015

Popsicle Card

I just  realized that never posted my Popsicle card. It is a quick end of summer card that I just couldn't resist sharing. It is also another great way to use the Martha Stewart Drippy Goo punch. This card would work great for a kid's party invitation, thank you, or and invitation to a summer get together. It is amazingly easy to make and cold be a great family project.

Enjoy,


post signature

Autumn Wreath Card


I love, love, love fall! I like the fact that it is getting a bit cooler, I also love the beautiful fall flowers and the changing leaves. I was so excited to play with my new Autumn Wreath die from Die-namics that I could hardly stand it. This die makes it fun and easy to create stunning Autumn cards. Today I am posting a video tutorial on how I created my card but I understand that many of you won't have this die at home. That is why I have included information on how you could achieve a similar effect without this adorable little die set.

Happy Scrapping,

post signature

Monday, May 11, 2015

Clear Plastic Sleeves for Stamp and Die Storage

I recently purchased some clear plastic sleeves for storing my rubber stamps and dies. I was looking for a more space efficient way to store the items but didn't want to spend a lot of money. A friend told me about these great bags that are actually designed for DVD storage. They are large enough to fit the DVD case artwork (14mm) so they will also accommodate the artwork from my Stampin Up stamp sets and they have a simple flap closure at the top. They are similar to the Avery Elle storage bags but are much much less expensive. I got 200 of them for $19.99 and the shipping was included. Pretty awesome huh? I am posting a link to the site below. (Just copy and paste it into your browser) I haven't decided how I am going to approach this project yet. Not sure if I will just try it with my non Stampin Up sets or if I will go "all in." but whatever I decide, I have supplies to get started.

http://www.checkoutstore.com/CPP-Clear-Plastic-Sleeve-with-Flap-Fits-14mm-DVD-p/cppl.htm

post signature

Friday, April 24, 2015

Bright and Cheerful Card

I love those bright, shiny enamel dots that are so popular these days but they are so pricey that I rarely used them. Well you can only imagine how excited I was to learn that I can make them myself very inexpensively and best of all I can make sizes and colors that suit my own needs. I searched Youtube for video tutorials and started baking right away! I will post links below to three videos that I found particularly helpful. Since I started making my own dots I have found that there are pony beads available in at least 2 sizes (9mm and 7mm) and both work great but yield slightly different size dots and that Perler beads are available in about a million (ok that might be an exaggeration!) colors. You will have so much fun making your own enamel dots.

Today's card features two different sizes of enamel dots. The smaller yellow ones were made with Perler beads and matched well with the yellow paper I chose. The black enamel dot was made with a 9mm pony bead and is an awesome flower center. The card uses a bright and cheerful color palate and was super quick and easy to assemble. Hope you enjoy!


post signature

Thursday, April 23, 2015

Diorama Card

Today I am posting a fourth project from my "Scrapbook Getaway Weekend." It is called a diorama card. You can fold it completely flat (which is fantastic for mailing) but when you open the card it pops up to reveal a 3-D area where you can place a special image or greeting. It is so much fun to see someones face when they open a card and reveal something that they were not expecting. This card is much easier to construct than you might think so go ahead and give it a try. I am sure it will be one of your new favorites.

post signature

Wednesday, April 22, 2015

Elegant Gold Embossed Card

I hope you have been following along this week as I post one project from my "Scrapbook Getaway Weekend" each day. I had a blast making and sharing these projects with fellow scrappers and now I am excited about sharing them with you.

Foil papers are super trendy and hot right now but I have never had a good way to incorporate them into my card making. I decided to challenge myself to use some of the beautiful foil paper that was in a paper stack that I snagged on sale. (Really, who doesn't love a good sale!) Today's project is the result of that personal challenge and I love the way it combines foil accent paper and heat embossing to make an elegant but easy greeting card.

post signature

Tuesday, April 21, 2015

Waterfall Card

Welcome back! Today I am posting another project that we made at the "Scrapbook Getaway" Weekend. I will show you how to make a simple "Waterfall" card that could easily be sent as a greeting card or as an invitation. This interactive card gets quite a bit of attention because the moving parts always make people curious about how it works. It is really a lot of fun to make, give and receive one of these cute cards.

post signature

Monday, April 20, 2015

Baby Dresser Card

I spent the weekend at North Bend State Park. My friend, Michelle and I hosted a "Scrapbook Getaway Weekend" and had a great time! Each day this week I will post a video demonstration of one of the projects we made at the Scrapbook Getaway.

post signature

Sunday, April 12, 2015

Super Easy Birthday Cake Card

Wow! Yesterday was a busy day at Scrap-Fest. I had a blast sharing new ideas and techniques with my scrappy friends. The project I am sharing now is a fabulous way to use up scraps of paper left over from previous projects and it's a great way to turn out an adorable birthday card in no time at all. After this, you will look at your scrap pile in a whole different light! Enjoy!

post signature

Saturday, April 11, 2015

Screen Card and Butterfly Thinlet Card


Today I will share a couple of video tutorials with you. One is a super fun and easy technique for using a thin, intricately etched die as a focal image for your card and the other demonstrates a cool way to use a label punch and border punch to make a really unique screen card. Hope you enjoy!
post signature


Friday, April 10, 2015

Stand Alone Double Pocket Treat Holder


Hello! If you are participating in Scrap-Fest and want to see all of the latest demos then you have come to the right place. Today and tomorrow I will post the projects that I have demonstrated. You can come back here if you need  measurements or more detailed information about how a project was constructed. The video links will remain active indefinitely so feel free to come back whenever you like. You can also subscribe to this blog or my Youtube channel, crafting4fun247, Hope you enjoy the projects!

post signature

Wednesday, October 22, 2014

Thanksgiving Card Made With Nested Dies


Today I put together a Thanksgiving card that features a cute sentiment stamped on a die cut shape.  The front of the card is actually composed of several layers cut from the same set of nested dies and a hand written message can be hidden behind all the layers. What a fun twist on an otherwise ordinary card! I hope it makes you smile.

I used the Mingle All the Way stamp set and Deco Label Framelits from Stampin Up but I encourage you to experiment with whatever supplies your already own. You could even cut nested shapes with a Cricut or Silhouette machine if you don't have nested dies or a Sizzix.

Happy Crafting!
post signature

Sunday, October 19, 2014

Stack of Gifts Card

Now that I have recovered from Scrap-Fest and a recent scrapbook retreat with my girlfriends, I'm getting excited about Christmas. Over the past couple of years I purchased some amazing Christmas papers. I liked some of them so well that I saved almost every scrap! (Am I seriously the only one who does this?) Well, I found the perfect way to use up those tiny pieces that some folks said were too small to be useful. (Bah hum-bug!!) This is the ultimate card for using up tiny scraps and it is stinkin' cute too!

Enjoy!
post signature

P.S. Did you know that you can click on any picture on my blog to enlarge it?

Another Framed and Layered Card


This card is similar to the framed and layered card that I demonstrated in my last post. I used a different set of dies and even ran my frame through the Big Shot with an embossing folder to give it some added texture. The penguin stamp is from Hero Arts and comes with a coordinating die. I just added a touch of color with my blendabilities markers and popped it up inside the frame. When I searched my stash, I found the perfect sentiment to complete my card. Isn't if amazing how you can use the same technique to achieve so many completely different looks? Hope you are giving this technique a try!

Happy Scrapping,
post signature

Friday, October 3, 2014

Framed and Layered Christmas Card


I just have a quick post today. I wanted to show you an easy technique for using two nested dies to create a frame that can can be used to showcase any focal image on your card projects. I used Spellbinders Nestabilities Labels Seventeen dies to make a frame for the front of my card. Then I "displayed" some great ribbon and a stamped image in my new frame. There are lots of ways to adapt this technique and it could be used for any occasion. I am sure my crafty friends will come up with some brilliant ideas. Please share!

Happy Crafting,
post signature

Wednesday, September 24, 2014

Holiday Soap Dispenser

This project was inspired by one  I saw on Pinterest.  I purchased a bottle of liquid hand soap from  my local craft store for just $1 and it worked perfectly for this purpose!

This project would make an awesome budget friendly holiday gift and it would be simple to mass produce (teaches, neighbors, coworkers...)  I already have a long list of occasions I will be using this for.

Enjoy!
post signature


Monday, September 22, 2014

Money Holder Card


I am so excited to share this fun envelope punch board project. Everybody needs a money holder card sometime! and cash is always a PERFECT gift.

This is a fast, simple project that can be adapted for any occasion. I used paper from a very old Christmas pad and one of my favorite old stamp set but you could use different papers and embellishments to create a totally new look.

Happy Stamping,
post signature

Quick Card Recipe


Today I am sharing a "recipe" that I have used many times. When I need to produce a great card in a hurry I grab small piece of my favorite patterned paper and a couple of colors of coordinating cardstock. Then I select something that I want to use as a focal image. Usually that's a punched or die cut shape or a stamped image. Then I just follow the "recipe" that I am sharing with you. So far I have never been disappointed in the results. Go ahead give it a try and let me know what you think.

Be crafty!
post signature

Fun Flower Hello Card

Can you believe that I am posting a second project today? I am on a roll and thought I would upload a second video tutorial before I ran out of steam. This project features the brand new Fun Flower punch and the Blossom For You stamp from Stampin Up. They are great because they are designed to coordinate with one another. I also incorporated some of my Project Life supplies to make this cute fall card.

Enjoy!
post signature

Tone on Tone Double Embossed Card


I have quite a bit to share with you this week. I am busy preparing projects for the upcoming Scrap-Fest fundraiser and a retreat with my crafty friends. As I complete my projects I will upload video tutorials so you can share in the fun.

The card I am making today is quick and simple to assemble but the results are stunning and people will think you spent ages making it.  Grab your embossing machine (Sizzix, Cuttlebug, Vagabond ...) an embossing folder, some punches or dies for creating small flower and leaf shapes and a piece of cardstock. That's pretty much all you will need to complete this project.

Happy Scrapping,
post signature

Monday, June 23, 2014

Pennant Birthday Card


Sorry I haven't posted much lately. I seem to be having a hard time juggling my work schedule, travel plans, my social life and finding time to craft. You may have noticed that I conveniently left housework off of that list. Do you suppose it will just go away if I ignore it long enough?

The card project I am sharing today is one you can use if you need to make a card in a flash. I like the fact that it is gender neutral (especially if you omit the little yellow flower) and can be adapted for different occasions by changing the sentiment and using different patterned paper. Happy Crafting!
post signature

P.S. In the sample card above, I used the EK Success Real Estate Sign punch to make the red layer instead of the Stampin Up Decorative Label Punch. Both work beautifully with the Stampin Up Extra Wide Oval punch.


Wednesday, June 11, 2014

Father's Day Gift Bag


The gift bag I am demonstrating today is one that I designed after I was inspired by several different Father's Day projects I saw on Pinterest. I just love that fact that you can make it in only a few minutes with a few basic craft supplies. This would be a great project to make with your children and it makes a cute presentation for a  Father's Day or  man's birthday gift. Enjoy!
post signature

Wednesday, June 4, 2014

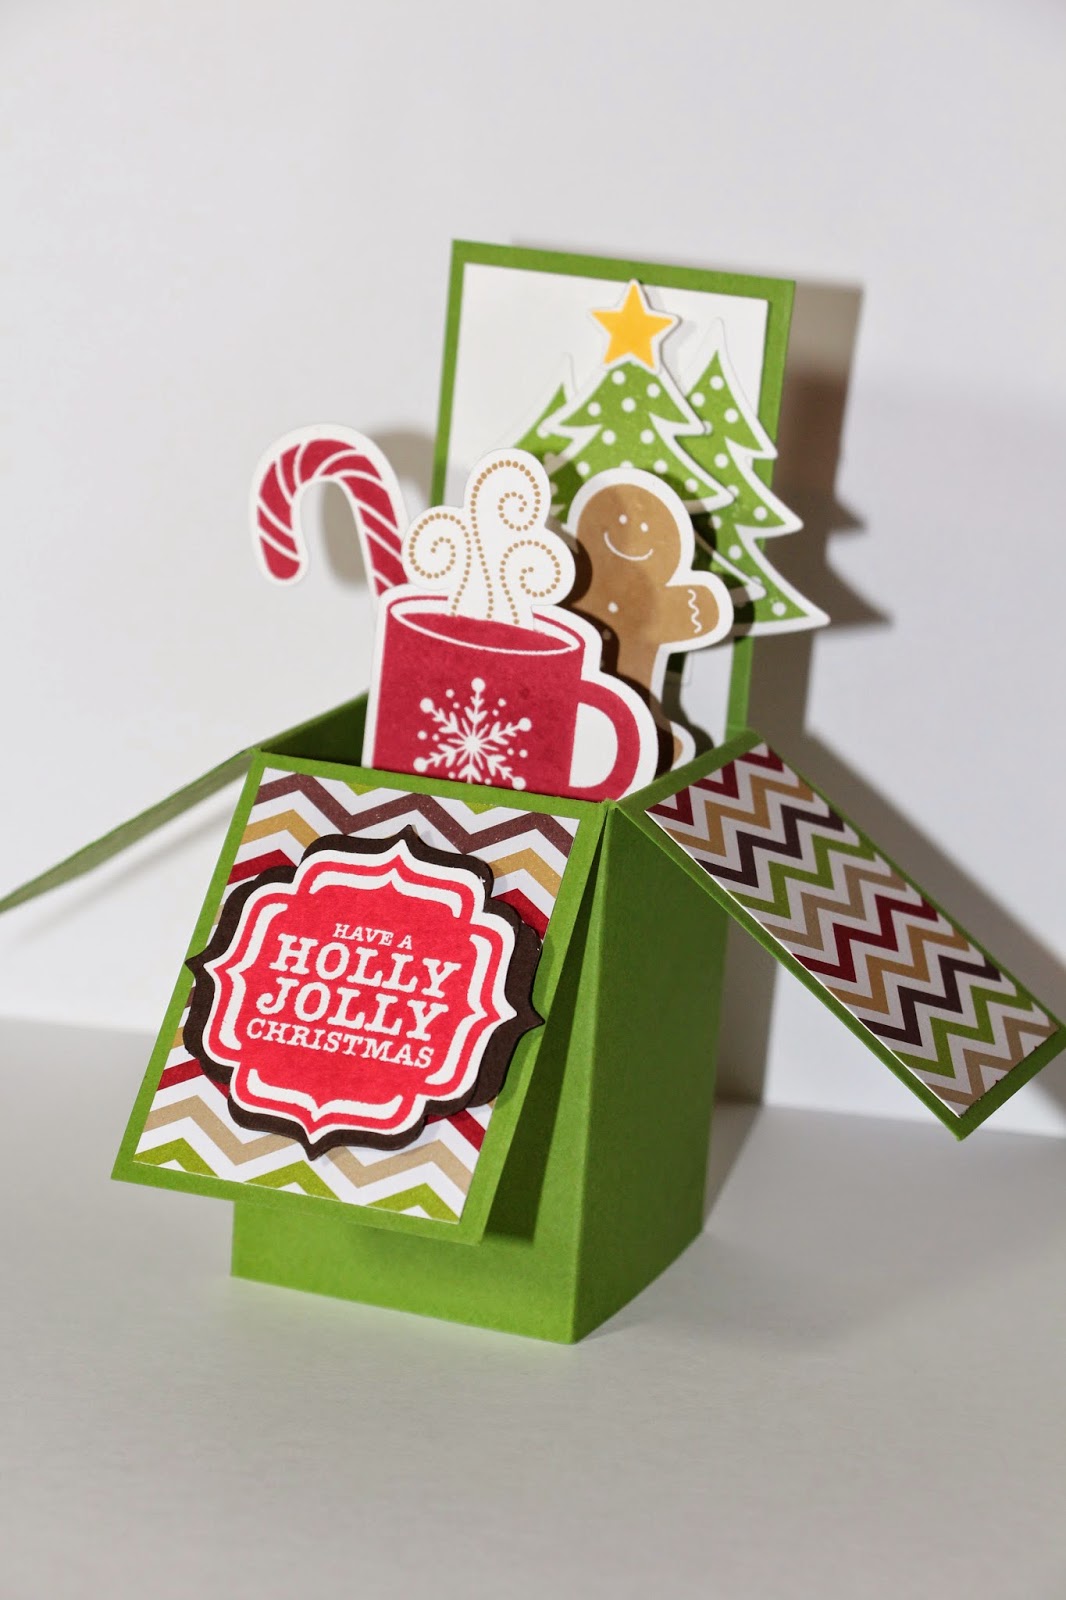
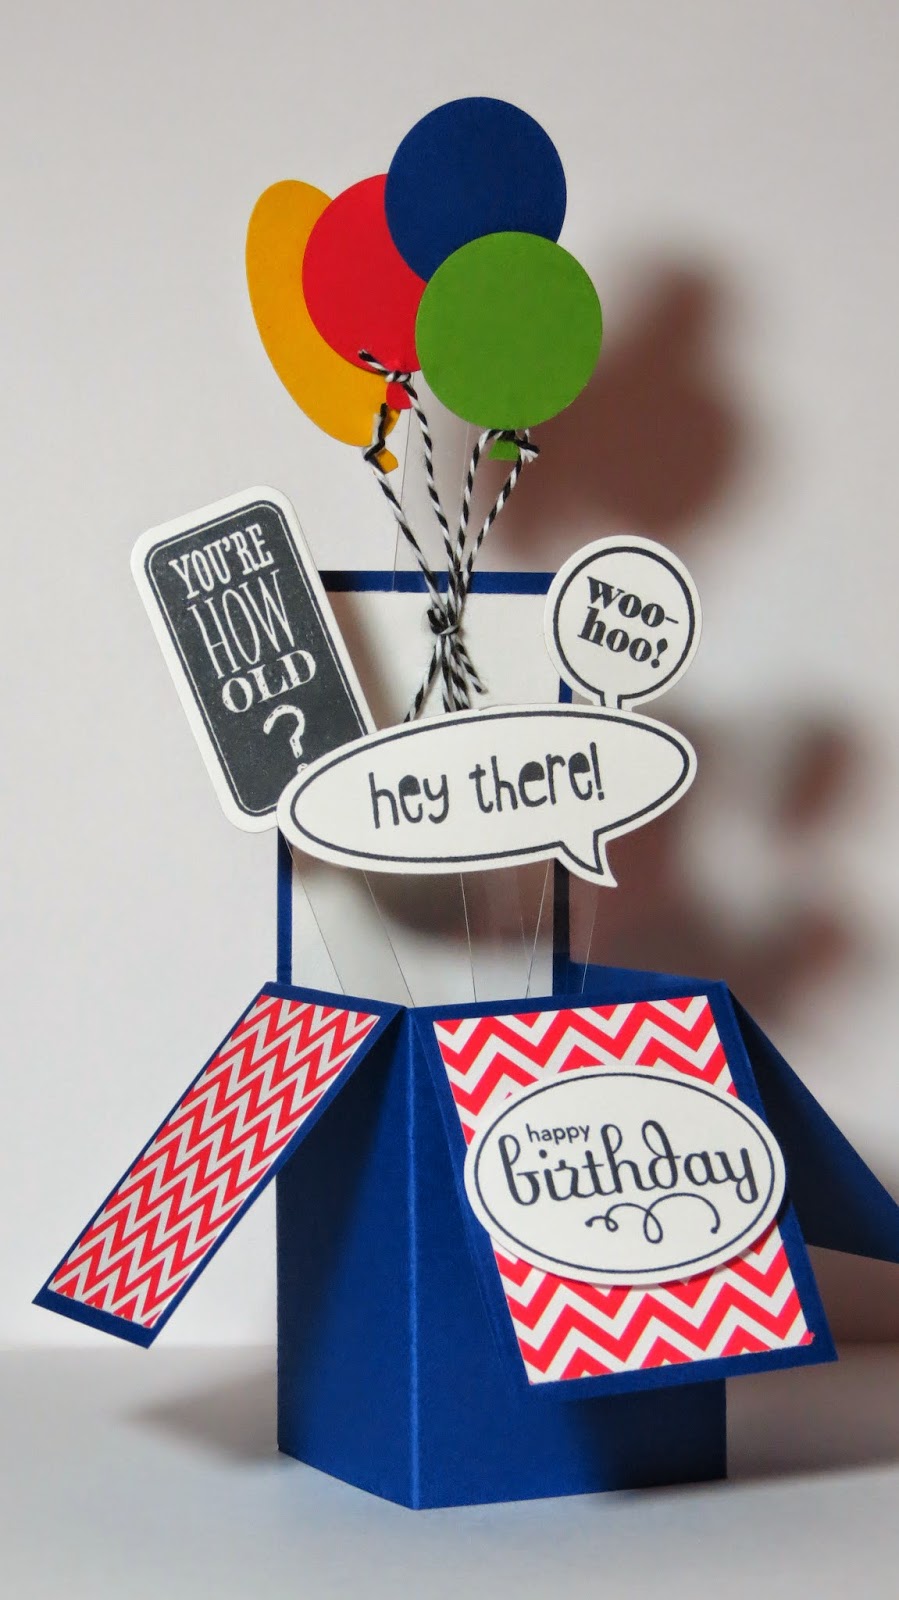
Card in a Box


Wow! I am so excited to show you what I learned today. The "card in a box" idea is all the rage right now and today I figured out how to make one. For some reason I thought it would be difficult to measure and cut and complicated to assemble but that's just not true! It is a snap to make and it really doesn't require many tools.

How you decorate your card in a box is what makes it unique. I had the Just Sayin' stamp set and framelits out on my desk (Nope, I still haven't put them away since I made the cell phone card) so that's what I used. Then I couldn't resist making a second one with the Sentsational Seasons stamp set and matching framelits. I have seen crafters make them for birthdays, graduation, congratulations, get well .... I am absolutely certain you will come up with a reason you need to make one of these.

You might want to add a writing panel to the back of your card in a box so you can write a personal message to the recipient. Just cut another 1 3/4 x 5 1/4 inch piece of cardstock and adhere in place. You could also decorate the outside of the box. The possibilities are endless!  Happy crafting.

post signature
P.S.  In my samples I used strips of acetate (3/8 of an inch wide x 2 or 3 inches long) to elevated some of the  elements on my cards. This adds height without taking up any visual space. Just attach them to the baffles inside of your card. You can just use the clear plastic from packaging if you don't have any sheets of acetate.


FYI, if you need to see more detail, you can click on any photo to make the image larger :-)


Monday, June 2, 2014

Leah's Tiny Explosion Box


The project I am sharing today was inspired by one of my youngest followers. Her name is Leah and she is just about to finish the third grade (yeah!) Leah loves paper crafting and is lucky enough to have a mom who is willing to share some of her tools and supplies. The other day she showed me a darling little box she made, so I ask her if I could share it on my blog. Thank you Leah for being so kind :-)

The box is a 2 inch cube and it opens up like and explosion box. There is a little "platform" in the bottom that can be sized to hold lots of goodies. Leah's box was designed to hold a votive candle but I put glitter in mine. It is a fun project to make and is a great way to get a little extra mileage out of your scoring board. 

Leah made her box from solid card stock and decorated the sides with pieces of patterned paper. I thought it might be easier to use a nice heavy weight patterned card stock to make my box and decorated it with a simple tag. No matter which way you decide to make your box, I'm sure you will love this project!


post signature

Wednesday, May 28, 2014

Cell Phone Card with Speech Bubbles


Cards with speech bubbles are very popular right now and texting is about the only form of communication teenagers respond to.  I believe a card that combines both is perfect for a teenager. Today I made a fun, trendy card similar to one Becky Jensen posted on Pinterest.  It resembles a cell phone with texting on the screen in the form of little speech bubbles. I sent the original to my 16 year old niece. I hope she likes it enough to send me a cool text!

It would be fun to create your own personalized speech bubbles. Just type whatever massages you like on your computer and print them out. Then use a punch or die to cut them into shapes. You may have to experiment with font size to get the words to fit properly but the possibilities are endless!

post signature